Today I will be covering the following steps:
3. Installing Audio Software to Record Your Podcast
4. Using Audio Software to Record Your Podcast
So, let's get started with installing the audio software.
3. Installing Audio Software to Record Your Podcast: You want to use the best possible free software to edit and prepare your podcast. The one I recommend is Audacity. It's free and a very good sound editor. It can be found by clicking on the picture above. Once you go to the site you want to download Audacity 1.2.6 Once you get to the site you will want to choose Audacity 1.2.6 installer and if the download does not begin, choose the option direct link Save the file to your desktop. When you are using the software in Audacity you will need to convert your sound files to an Mp3 and you will need to download the LAME encoder by going to LAME Mp3 Encoder Once you visit the site, you will need to choose the operating system you are using, then click on the LAME download page Toward the bottom of the page you will see the following picture.
 Click on the appropriate link on the site, and save it to your desktop. Next, you will go to your desktop and double click on the icon
  and it will ask you to run it, click run and follow the instructions. You will want to remember where you saved it, usually it will be in your Program files menu. Next, double click on the audacity icon
  on your desktop and you will see the following:
  Open Audacity and click on Edit -> Preferences -> File Formats Now this is what you will see. Click on Find Library and follow the instructions. (Here is where you want to find the LAME Mp3 Encoder file, remember it is under Program Files)

Now you are ready to record. Check on the microphone Meter toolbar in Audacity and you should see a red level indicator moving when you start recording. You can talk into the microphone and make adjustments to the volume until it looks like the picture below.

Now, your almost ready to record. Down below in the picture you will see the featured buttons to start your recording.
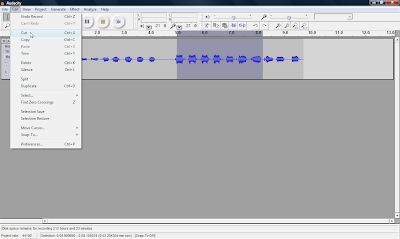
Simply push the Record button and you can start talking. When your done recording press the yellow square button to Stop the recording. If you want to edit your file, where you want to cut out parts of your recording or delete parts. You simply edit out parts by clicking and dragging to highlight the part you want to remove. Select Edit and choose either Cut or Delete. The part you want to edit will turn a grey shaded color. If you want to keep only one section of a recording, highlight that section and select Trim from the Edit menu. Take a look at the picture down below and you will see how to edit your clip.
 You can also record many multiple tracks to add to your podcast, which is one of the many features you can't do with movie maker 2.
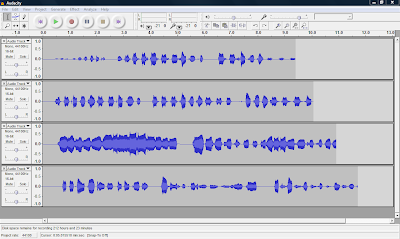 Ok, next week I will be talking abou the final steps in your podcast, step 5. Turning your Podcast into a Vodcast and step 6. Publishing and Promoting. I will also be covering how to add music to your podcast and how to convert your WAV file to an MP3 so you can post online. See you next week.