Today, we are discussing how to work with the new video footage you have filmed using your Digital Flip Camcorder. The first thing you need to do is pull on the latch on the side of the camcorder, and the USB Connection will come out. You then plug this into a USB port on your computer.
Once you plug it in you will need to install the software that is inside the camcorder. That's right the software is built inside the Flip Camcorder. No need for an installation disc. When you plug it in, the following menu will come up:
Once you plug it in you will need to install the software that is inside the camcorder. That's right the software is built inside the Flip Camcorder. No need for an installation disc. When you plug it in, the following menu will come up:

You will choose the top option View Your Flip Camcorder Videos Using the Programs Provided on the device. Click OK and then you will see a licensing agreement by flip that you must agree to. Once you agree, you can install the software. Next you will see this menu:

Follow the instructions for installing the software. It may ask you to restart your computer to use the software. Sometimes this is not necessary. Once the software is on your computer you will see the following menu or the videos will automatically start loading in the software.

You can click on the first option View & organize videos, and all your videos will load on the screen, like below or they may load automatically. Most of the clips you will see are from a snow storm we encountered on my way to Abilene, TX. back in December of 2009. For the full edited video please visit: http://mrybarra.blogspot.com/2010/01/new-flip-camera-by-flip.html This is the first view in which you can see the videos lined up on the left side.

Here is the second view option that you can choose to work with.


To edit your videos, simply click on the scissors and you can trim it the way you want. You can also resave your movie with the new edited video.

During the edit process you can chose to resave it or replace the current video.

When you are ready to make your movie, click on either of the Movie buttons down below.

To create your movie, you just click and drag the videos into the boxes that are listed 1st, 2nd and 3rd. Every time you add a video a blank video box will appear in case you want to add more videos to your movie. When you are done you can click on the Magic Movie button and your move will be created automatically or you can click on Full length to continue making your movie.

Next, you can add titles and credits to your movie. Simply click in the white text area and type your title. When you are done click Next

You can also add background music to your movie, if you prefer. The software comes with it's own type of music or you can add your own music.

Now, you are ready to name your movie and save it to your computer. You might want to change the location of where you want to save it. You probably want to save it on your desktop so you can easily find it.

If you go to the create menu, you can also take snapshots of your video. Yes, you can save any part of your video as a picture.

Just click and drag the picture you want and then click on save. It will save it to the Flip Digital Video Library.

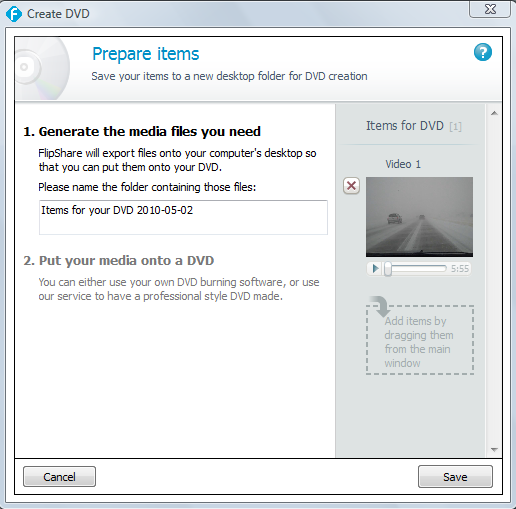
Now, you are ready to create a DVD.

Here is a closer view of the Create DVD menu above. Flipshare will save your Movie in a folder on your desktop.

Next week, we will be reviewing other ways to share your movies through online web sites, and how to work with other compatible softwares. See you next week.
